Saturday 30 May 2015

Cheese, Leek and Walnut Pie


Good evening, or morning, or whatever time of day in which you find yourself! I have a tremendously filling and substantial meal to share with you today. One which is ripe for alteration and addition; the possibilities are endless, to be honest. This cheese, leek and walnut pie is from Tesco's food website, Tesco Real Food, and there are some really tasty recipes to be found there, though I must say, the mobile site is somewhat irritating to navigate, and I don't seem to be able to access my recipe folder (if you're reading this Tesco, help!). Please also take note that where the recipe states it will serve six, this is not inaccurate, as I found after serving myself and Husb with a third each, and the Tonjus with a sixth each!

I didn't make any changes to the recipe on this occasion however. The only thing I did differently was to make my own shortcrust pastry, which I've got into the habit of doing since I first made Ruby Tandoh's deliciously simple shortcrust at the beginning of the year. For this recipe, I used my appropriated Hugh Fearnley-Whittingstall shortcrust, which you can find here, just after the second photo down, and made the same amount as for the recipe on that page too, so no amendments necessary. I've done a brief recap here, but for full instructions, please refer to the link. Please also refer to the recipe link for the ingredients list and full recipe method. Here, I have given a run through of most of the recipe, as a visual aid, but I haven't reproduced the method.

Add 180g cold, unsalted butter to 350g plain flour and a pinch of salt

Rub with your fingertips until the mixture resembles breadcrumbs


Prepare the milk and add, leaving a bit at the end so as not to make the pastry too wet

Bring together with a knife, and your hands towards the end, adding the final splash if necessary, to bring it together


When it forms a nice ball, wrap in clingfilm and refrigerate for at least half an hour


I made this pastry quite early in the day. If you do the same, remember to remove it from the fridge a good 15 minutes before rolling it out so it is soft enough to be pushed into shape.

I do like the way the recipe instructs you to cut the leeks. A small detail I know, but it allowed them to cook really nicely and evenly: "halved and cut into 3cm chunks."


Space the leeks out so they can cook evenly


 Whilst the leeks are cooking, the pastry is prepared. I must say at this point, that this recipe turned out to be rather photogenic. I am the first to admit that my photography is about as ameteur as you can get, but the shape of the pie and the method and construction lend themselves to being photographed.


Once the pasty has been halved, roll out one half so that it is large enough to fit a dinner plate. 


Cut out around the dinner plate...


...then place on a baking tray prepared with a sheet of baking paper.


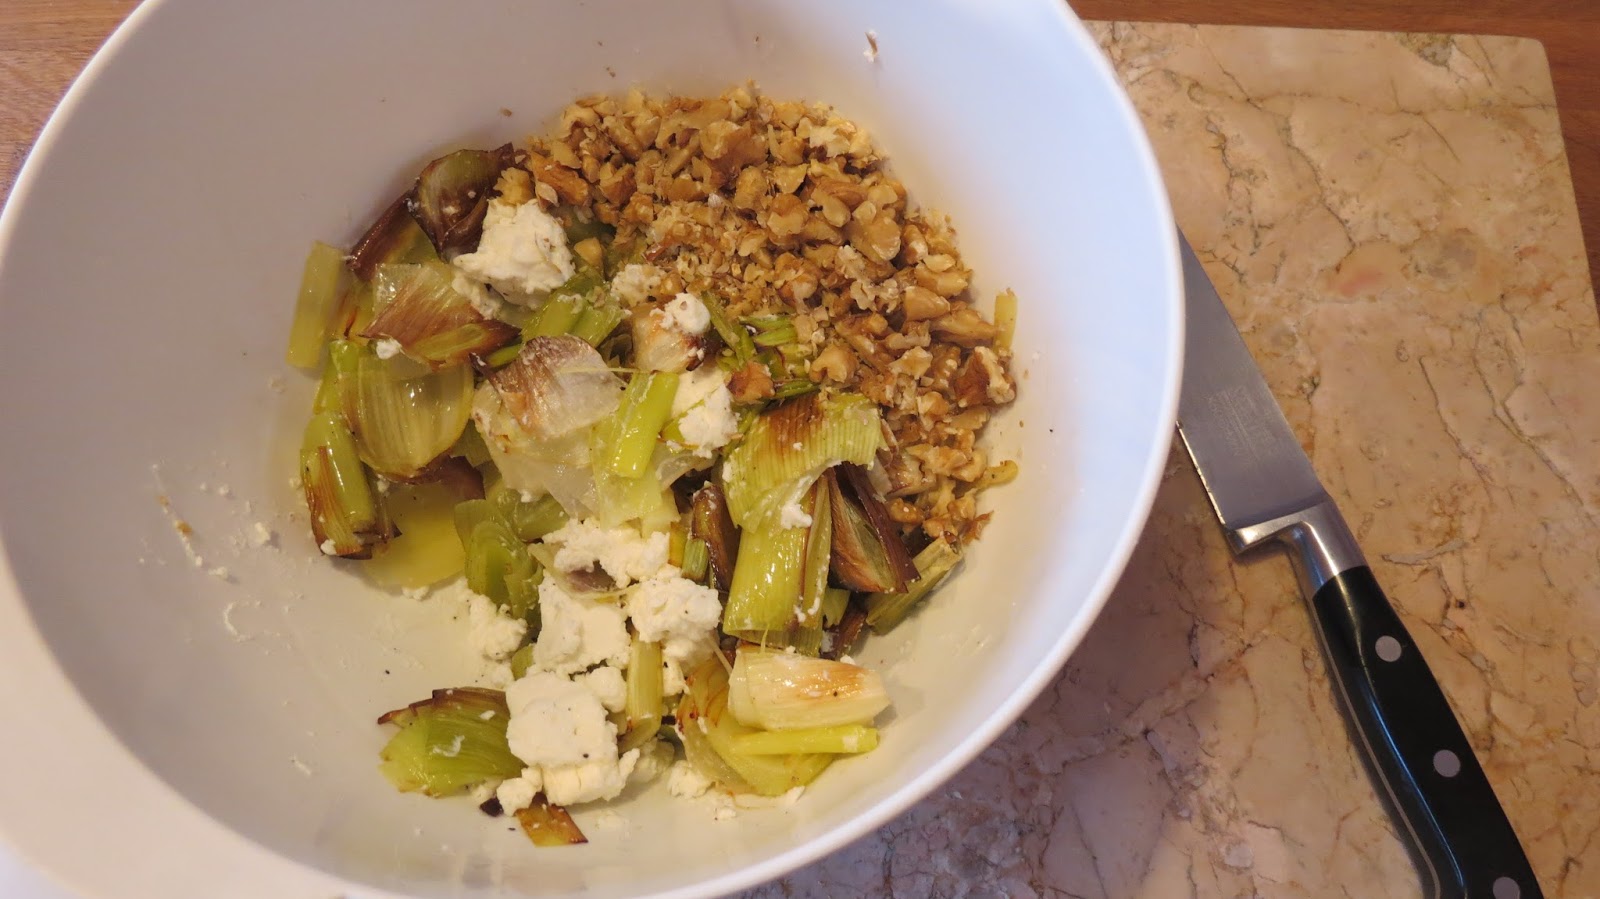
Gather together the ingredients for the filling, including chopping the walnuts. I find a chefs knife works perfectly for cutting most things actually, but it is particularly excellent for chopping up nuts.


 Leeks and goat's cheese combined
 
Walnuts and seasoning added...

...and all combined

Now the construction can begin. I highly recommend you use a pallette knife to spread the sun-dried tomato tapenade over the pastry base; it makes it so easy to spread and work with.


It's really important to leave that border to allow the lid space to attach to the base.


The leek, walnut and goat's cheese mixture is then added and evenly distributed over the tapenade.


Assembly comes next. The method says to brush the border and afterwards the whole surface with beaten egg. I made an eggwash however, with a beaten egg mixed with a slosh of milk, which is far easier and less slimy to apply, and also doesn't leave you with "eggy puddles" on the surface which can be liable to burn in the oven, creating a burnt egg taste on parts of the pastry!


Place the second pastry round on top of the base and filling, and press the edges together, ensuring there are no gaps for the filling to seep out of. Don't forget to make the little hole in the centre for steam to escape too.


 "Help" with the eggwash


I decided to serve our pie with some new potatoes similar to those in this recipe, but I didn't have all the ingredients, so I improvised, using just butter, half and half (equal quantities of double cream and milk mixed together) and seasoning. Take my word for it, you will not need many potatoes per person to go with this meal! If you want to do the same, put the potatoes in a pan with sufficient water and put on the hob to bring to the boil at the same time you put the pie in the oven. This way they should have been boiling for just over ten minutes by the time the pie is ready, and you can crush them and add whatever additions you like, even if it's just butter. It's a good idea to check your supplies of herbs, as chopped parsley would go very nicely with crushed new potatoes, as would chives.

Put the pie in the oven for 20-25 minutes. When it 's ready, it should look like this...


Now you can serve it up, and hope your eaters are hungry!


The pie did go well with the new potatoes, but I would definitely recommend serving it, alternatively, with a salad. I think if I'd perhaps been a little more restrained with the portion size, the potatoes would have worked better, but there was a lot of stodge on this plate. We are so unused to having pie which is fully encased in pastry, rather than just a pastry lid, that it really did fill us up tremendously quickly. Perhaps, being as there are walnuts in this recipe, that a small Waldorf salad would be an option. Or maybe I'm only suggesting it as an excuse to link to this...


If you do fancy a Waldorf salad, this looks like a good recipe, and perhaps the apple would be a welcome refreshment from the pastry making the whole thing a bit lighter. Of course, it isn't necessary to serve this pie with anything if you'd rather not, though for some more variation in flavour, you could add some additional ingredients. My old favourite, shredded cooked chicken, would be delicious, as would some fried-until-golden chestnut mushrooms and onions, and perhaps a tin of sweetcorn for a little sweet hit (I would totally add all of those to one pie, in case you wondered!)

So as it happened, neither Husb or I were able to finish our gargantuan portions, which is not the fault of the recipe, but of my eyes being bigger than my belly. I returned about a third of mine to the baking sheet, as did Husb. This didn't matter however, since there was some for lunch the following day. If you are making this for a family the size of mine, I'd recommend reducing the amount of pastry you make, and use a side plate instead of a dinner plate as a template. Because of the copious amount of pastry, it should be sufficiently filling. Especially if you serve it with that Waldorf salad...


I really do recommend this recipe, and it's fun to make. Have a go with some alterations and see what you can come up with.

Happy cooking :)

xxx Sam

Monday 25 May 2015

Old-Fashioned Chicken Stew and Dumplings


Hello friends. I know it's been a little quiet over the last week or so in the Cooking for Sanity kitchen; sometimes things happen in life to make writing a blog seem like the least important thing one could possibly do, and I certainly haven't been in the right frame of mind to sit down and write about food, even though I've been cooking plenty of it. So tonight, I'm hoping to reignite your taste buds with a delicious, traditional recipe full of rich flavours and textures, and a slightly unexpected but genius ingredient. I've also been wanting to write this up because I was asked a short while ago for some inspiration as to how to use up spare chicken thighs and drumsticks, so I apologise to my friend, for whom I had hoped to make this available this much sooner.

This recipe is adapted from the fantastic and immensely visually appealing Grandma's Best Recipes which I bought in good old M&S quite a few years ago. It doesn't seem to be available at present, and I don't know if that's because it's out of print, but if you do come across it, grab it, because it really does contain some lovely traditional recipes, including a fail-safe toad-in-the-hole, and spaghetti and meatballs. My adaptation of the recipe was reached due to having cooked it quite a few times and having perfected amounts and the method to reach a more satisfactory final meal. I hope it's something you can enjoy with your family too. Because it's cooked for a good while, the flavours develop really well, making it especially tasty for little people.

Ingredients

Please try to avert your eyes from those bedragelled looking spring onions; I was meant to make this the previous week but ended up having to carry this recipe over, hence, they are not at their best looking!

Stew ingredients
2 chicken breasts (or whatever type of chicken you have; thighs or drumsticks will also be fine)
3 carrots
1 onion
1 celery stick
2 large garlic cloves
Handful fresh thyme sprigs
Bay leaf
2-3 tbsp plain flour
500 ml chicken stock
500 ml water
30g butter
Slug of olive oil

Dumpling ingredients
150g plain flour
1/2 tsp salt
1 1/2 tsp baking powder
30g butter
4 thinly sliced spring onions
3 tbsp buttermilk
Approx.120ml milk
1/4 tsp bicarbonate of soda

Method

Pre-heat a large stove top casserole or deep heavy-based frying pan to medium high and pour in olive oil. Season chicken breasts and place in casserole for a few minutes on each side, until golden brown.


Prepare the stock, garlic, bay leaf and thyme and add to the pan, along with the water.


Bring to the boil...


...cover, and reduce the heat to a gentle simmer for 25 minutes.


In the mean time, prepare the carrots, onion and celery.


Once the chicken is cooked, remove to a chopping board, strain the remaining liquid into a bowl and reserve for later.


Return the casserole to the hob on a medium heat (there is no need to wash it out) add the butter, and once nicely melted, add the chopped vegetables.


Allow to cook for about five minutes, stirring occasionally, and in the mean time, shred the chicken and cover with foil to retain the moistness.


After five minutes, add the 2-3 tablespoons of flour to the veg and cook, stirring constantly, for a minute or so. Season.


The reserved cooking liquid now needs to be slowly returned to the pan. I have a large jug into which I strained it, which enabled me to gradually pour in the liquid whilst constantly stirring. If your cooking liquid is in a bowl which will not facilitate easy pouring, add the liquid with a ladle or large spoon instead. If you just throw it all in without stirring at the same time, it will become lumpy.


Bring to the boil, cover, reduce heat and simmer for half an hour until the veg is just cooked through.

About five to ten minutes before the vegetables are ready, prepare the dough for the dumplings.

Place the flour, salt, baking powder and bicarb into a bowl and mix well together. Cut the butter into cubes.


Add the butter and rub in with your fingers until the mixture resembles breadcrumbs.


Add the spring onions and buttermilk, then add about two thirds of the milk before mixing together. Keep adding the milk until you reach the right consistency. 120ml should be pretty spot-on, and it's the amount I amended the original recipe to, but still, add it slowly as you don't want a sloppy, liquidy dumpling dough.


Once the veg is ready, remove the lid and return the shredded chicken to the pan, mixing in well, then return to the hob and increase heat to medium.


Now it's time to add the dumplings. If you've never made dumplings before, nothing can prepare you for how greatly they will have increased in size when you remove the lid after the final 15 minutes, so arrange them as far apart as possible, to avoid gargantuan mutant dumplings which can't be separated!

Rather than fashioning the dough into balls before adding them, I find it easier to use a table or dessert spoon, scoop up a not too generous amount of the dough mixture and carefully add it to the pan, perhaps using a teaspoon (or perhaps a little finger...) to aid full removal of dough from the spoon.


Once all the dough has been used up, place the lid on the pan and simmer for 15 minutes. Remove the lid and prepare to be astonished!


Once your jaw has returned to its usual place, dish up, trying to equally distribute those delectable dumplings amongst your eaters. As you may have noticed, I made rather a lot of dumplings for two adults and two small children. That is because I'm one of those people who hates the thought of there not being enough food, and of not being fully satisfied after a meal, so I overcompensate and often make too much food for the four of us. So yes,that does equal three dumplings each for myself and Husb, and two each for the children... that sounds too outrageous to admit to! 

This meal translates perfectly for small ones. It's full of veg, and the dumplings, although not the healthiest of additions, are nice and filling.


I adore this meal. It's hearty but not heavy, super flavoursome but really easy to make. You just need to factor in time and make it on a day you know you'll be home for a couple of hours before dinner time. And did you spot the genius ingredient? It was the spring onions. A dumpling could never be described as "fresh," but spring onions certainly a certain lightness to them, as well as an unexpected but very welcome flavour.

As usual, all the food amounts can be adapted to suit the appetites of those who will be eating, and the sauce is easy to adapt too, if necessary. It can easily be doubled, or made up to 150%, or however more or less you wish to make. 

I realise the recipes I'm sharing on the blog, whether they're my own or a going through of somebody else's, are rather photo heavy. I'd love to know, does that help, or is it more helpful to have more description and less photo? Also, if you have any questions about a recipe or how it could be adapted, please leave a question in the comments box or on the Facebook page, and I shall certainly do my best to respond and give a helpful answer. I really want what I'm sharing to be accessible and for it to inspire people who may not cook much to give it a go, and those who do cook already, to try some new ingredients or methods and to step out of their comfort zone.

I hope you enjoyed your dinner tonight, whatever it might have been :)

xxx Sam

Cooking for Sanity